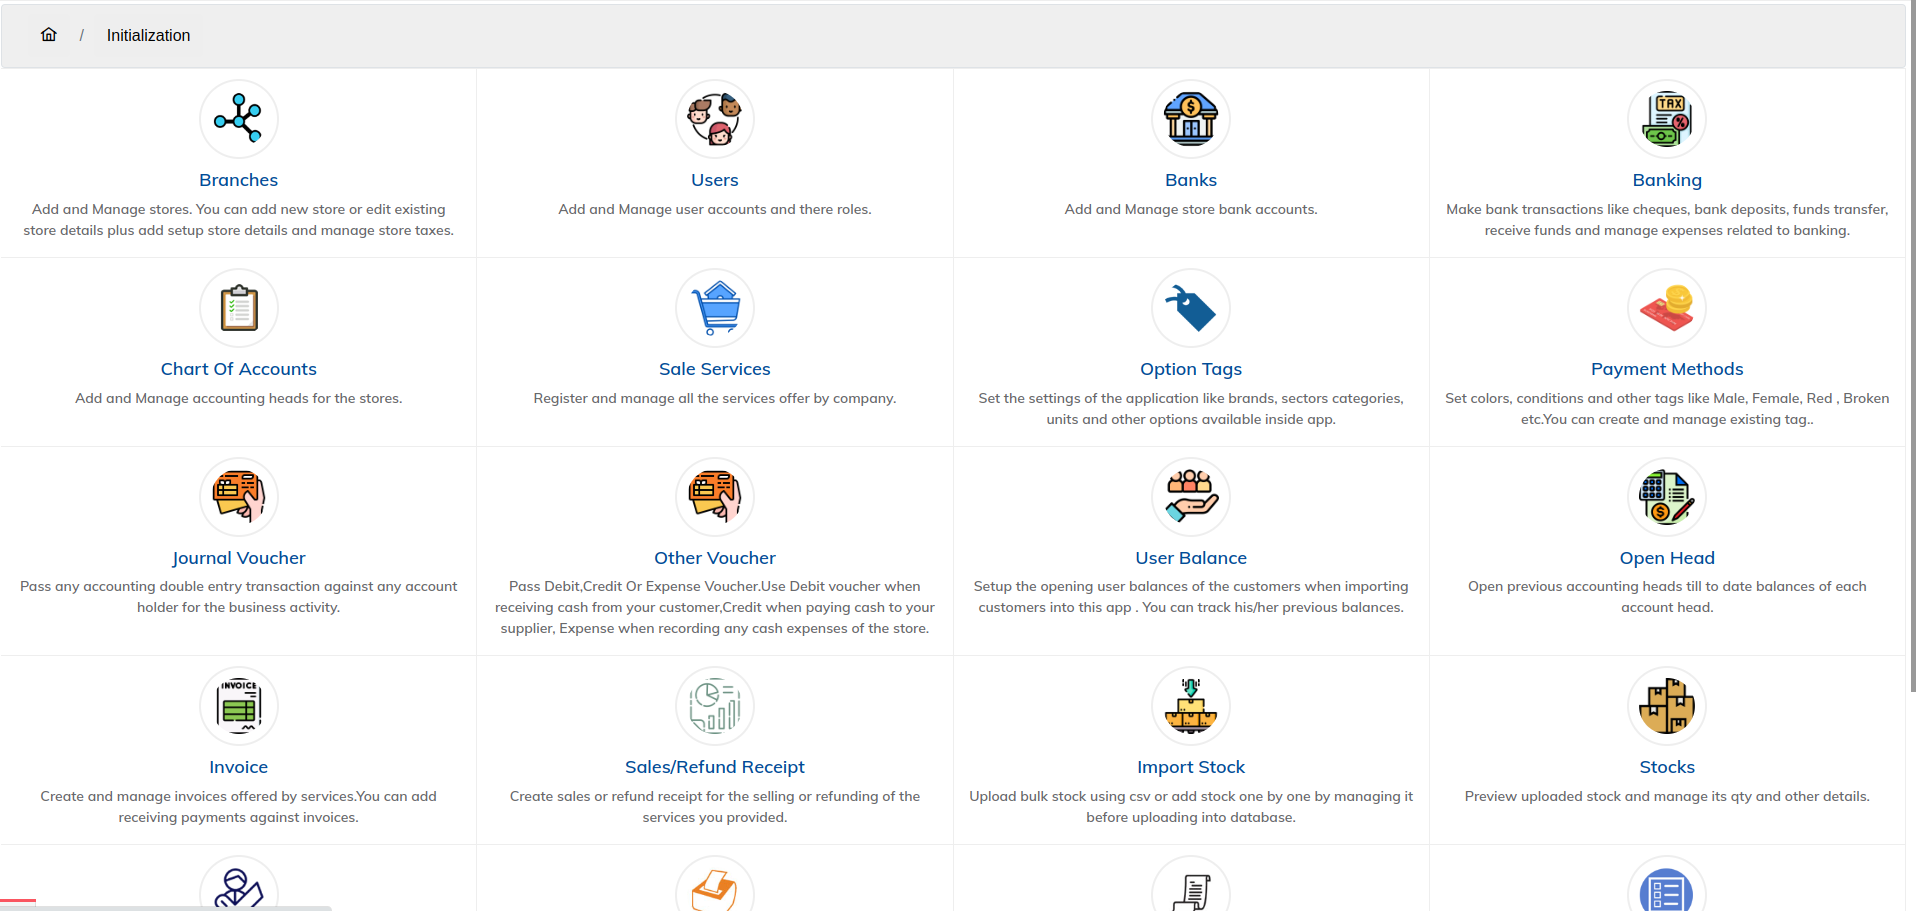
1. Branches
Add and Manage stores. You can add new store or edit existing store details. Plus add and setup store details and manage store taxes.You can search each store with there store code from the search field.
The important thing in the option is store code.It must be 4 numeric digits.The reason it should be 4 digits is each transaction like create invoice,refund, purchase etc has 4 digits store code in their transactions.
For example : INE-00012200000000
After INE- there is a 4 digit store code which is 0001 in our case.Just like this we have store code in all transactions.
After Store code there is 2 digits year no which is 22 in our case. After year there is a receipt serial no.
2. Users
In this option you can add new users to login into the app and manager their details like personal info or changing their login password.
In Users you can also set the user's privileges as well, Means you can set weather the user admin role or any other role which is defined already in privileges part.
Once you click on the user option you will be able to see the multiple colors buttons as you can see in the image below:

- Blue button : Use to edit the user profile or changing the user roles
- Yellow Button : Changing user password
- Green Button: Changing user's profile picture (Optional)
- Red Button : In active user`s profile
3. Bank
This option we already discussed in getting started section but not going in detail this option is used to add bank accounts that your business is using to do business transactions.
Adding a bank is straight forward the important thing here is Account type as we discussed this earlier.
If its a new bank account then choose New Account otherwise if its Existing account then choose the option, Choose the date and enter your bank balance till date by setting the Statement ending date.
4. Banking
Make bank transactions like cheques, bank deposits, funds transfer, receive funds and manage expenses related to banking. In Banking its all related to your bank transactions.Let's discuss banking options one by one and there purpose.
When click on the Plus button a popup screen will appear to pass a banking transaction.
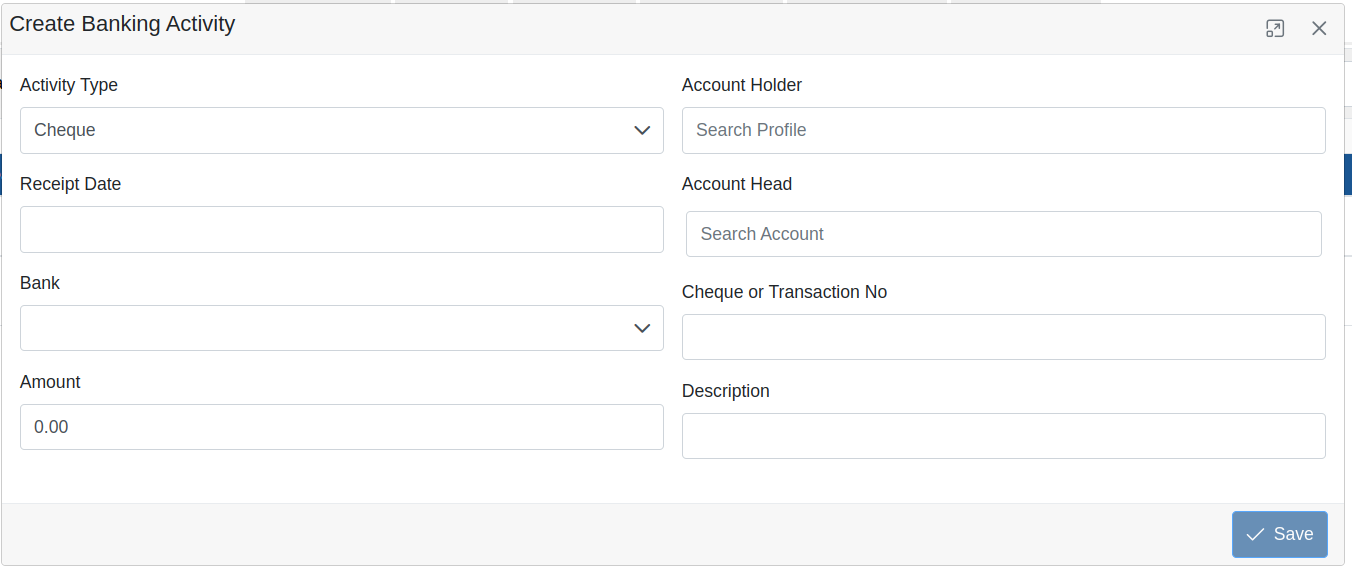
Activity Type
- Cheque: Used when you do payments in cheque for example employee salary.
- Bank Deposit: When you deposit amount in your bank.
- Fund Transfer: When you pay someone via bank though online.
- Receive Fund: When you receive payments directly into your bank from your creditors.
- Bank Expense: To record banking expense like cheque book fee, Sms fee or any bank service charges.
All the fields are required so you need to fill them all to pass a transaction successfully. Most of the options you see in this screen are very common but few are i guess confusing like,
- Account Holder: Choose the name of the supplier/customer to whom you are passing this transaction.
- Account Head: Accounting head for the purpose of the transaction for example if you are paying salary to your employees in cheque then you will be choose salary as a account head.In fund transfer you are paying someone so you may be choosing account payable as a account head.
5. Chart of Accounts
In this option we can add a new accounting head which is yet missing in the default once.All the options here are required and Account code must be unique otherwise it will throw an error.
6. Option Tags
Set the settings of the application like brands, sectors categories, units and other options available inside app. while adding new stock into the system, you will be seeing the list of these options.Here you can add new once based on your requirement and manage them.
7. Payment Methods
This option is already discussed previously on getting started section.In this option we can add payment methods like Debit, Credit, Master Card or any other option available in your country.
One important option here is choose the bank where these payments are going. for example when customer pays the bill using credit card, this payment will go to the bank account of yours so here you will be choosing the bank.
8. Journal Voucher
In accounting terms this voucher is used to pass double entry accounting transaction.In simple words you will be using this voucher when there is a financial transaction which is missing in this app. For example you are giving a advance salary to your employee so you need to record this entry.You can also use this voucher for recording cash expense however you can use expense voucher for this as well.
To learn more about journal voucher you can search it on google.
9. Other Voucher
Apart from journal voucher there are some others voucher like Debit voucher, Credit Voucher and Expense voucher. What common in these vouchers are the are passing against cash only. When ever you pass any transaction there will be cash amount will be reduce or add in your cash head.Lets see what each voucher is meant for.
- Debit Voucher: Use Debit voucher when receiving cash from your customer.
- Expense Voucher: Expense when recording any cash expenses of the store.
- Credit Voucher: Credit voucher when paying cash to your supplier.
Expense voucher will be using when lets say you pay for the electricity bill or any other utility bill or you are giving salary in cash only. Debit voucher will be using when you receive cash which was receivable from customer or any other receivable which you received in cash or paid in cash only for payable then you will be using credit voucher.
10. User Balances
User balance as its name suggests here you need to add all the previous customers and suppliers balances. For example you have a payable to a supplier of amount $100. In user balance here you need to record the previous amount.
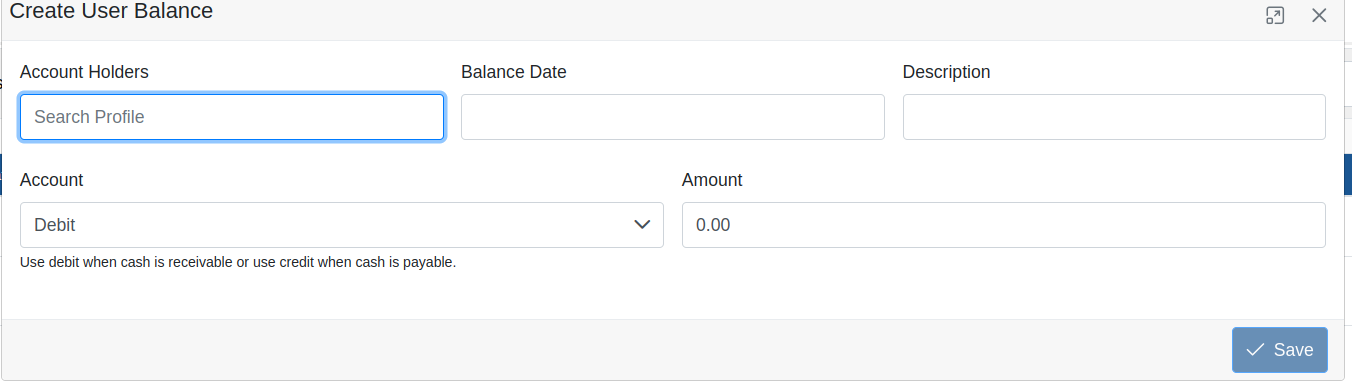
From the above picture choose your customer or supplier in account holder use debit when cash is receivable or use credit when cash is payable and enter the amount.
It is recommended to enter you user balances right after the store setup.
11. Open Head
Before making any transactions into the app. It is recommended to setup your accounting's heads first. Account heads are all your receivable, payable and assets etc.
If you were maintaining your trial balance of your business then there will be no issue to importing all your heads into this app.
If you don't have the trial balance statement of your business then make new one .We are not going to show you how to make this report for your business. You will be able to find tons of references to make on internet.
Lets assume that you have the trial balance Statement of your business.Click on the Open Head option you will see all the accounting heads. If want to add a new one then go to chart of account option from the previous menu.
Fill out your trial balance heads into the app.Make sure both Debit and Credit side must be equal otherwise it wont let you allow to save the records.
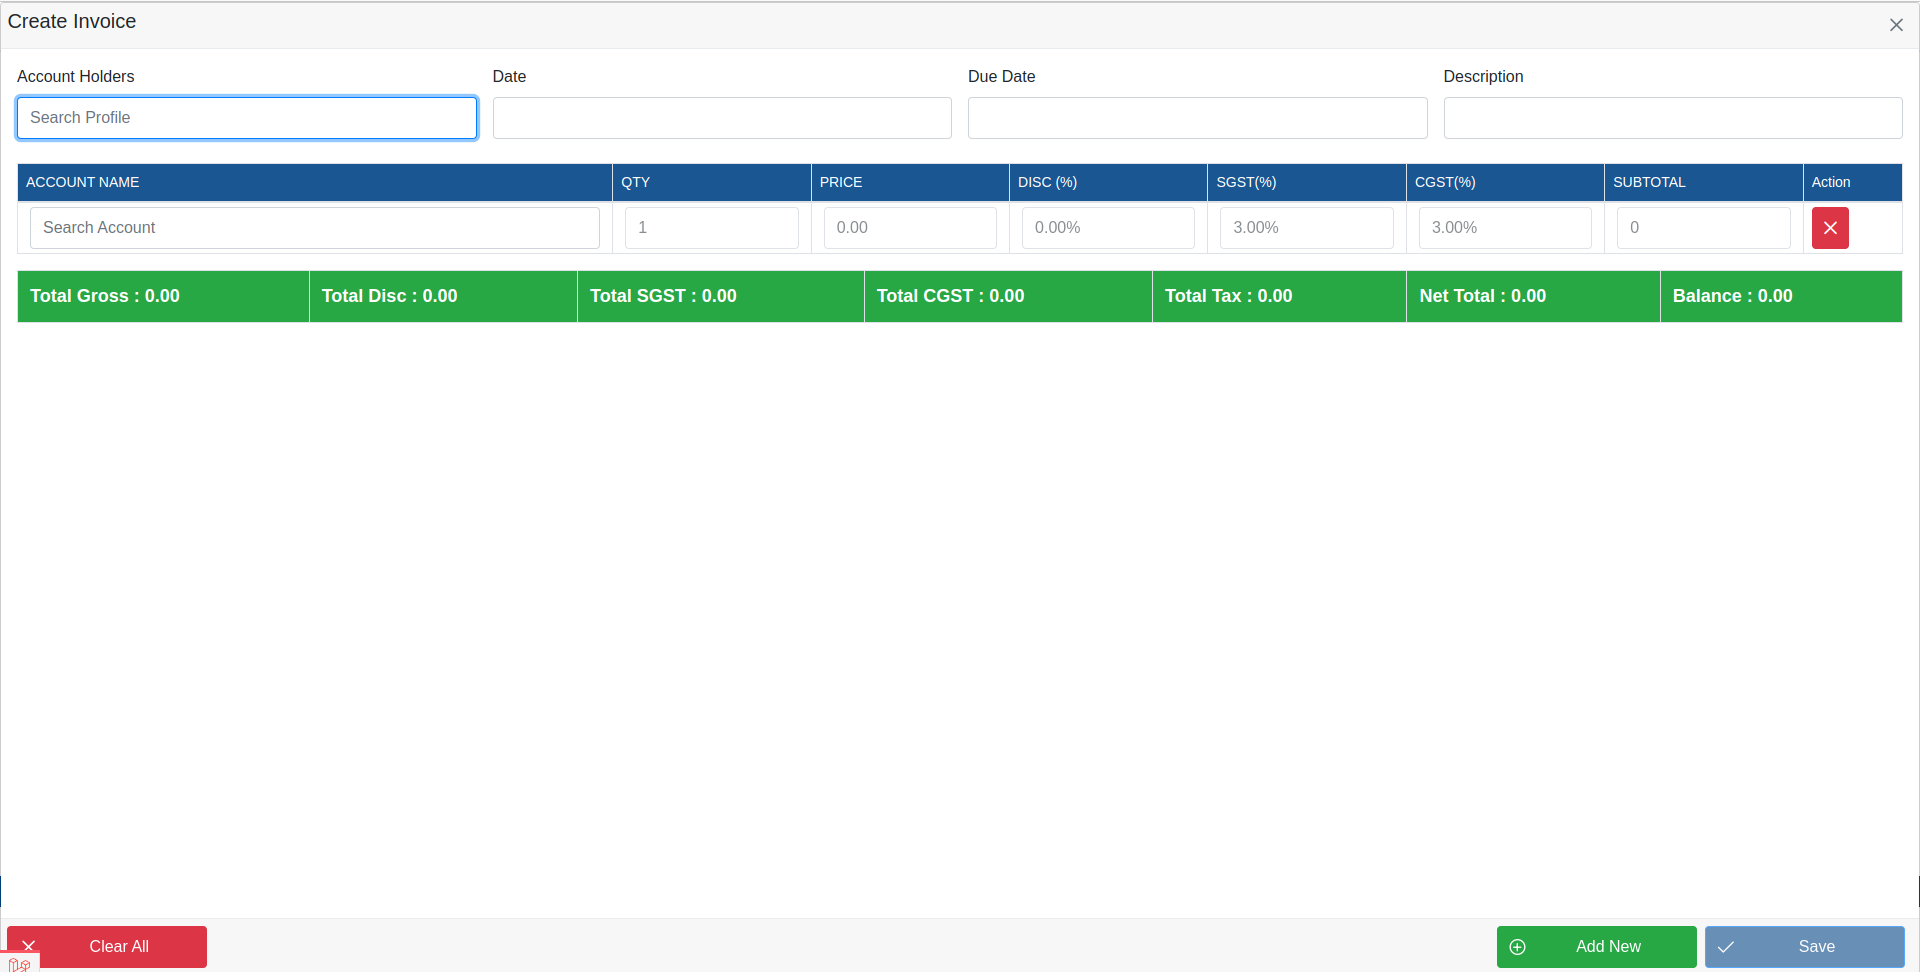
12. Invoice
Sometimes you provide services to your customers.For these services you will need to charge your customer for which you can create invoice in this app. Once you click on the option you will see list of invoices you created.Here you can see the following option buttons against each invoice.
- Green Button : For edit invoice
- Yellow Button : Preview invoice payments
- Blue Button : Preview invoice
- Red Button : Receive payments for due invoice
Below is the image for the reference of invoice list

There is a green plus button to create a new invoice.All the fields are required to create a new invoice.
13. Sale / Refund
You can create sale / refund receipt for the items or products you sale to your customer. Unlike invoice where you charge your customer after your services.In Sale receipt you create a receipt at the time of selling any item or product.
All the option you see are almost same like invoice explained above except here you will need to choose either you wanna create a sale or refund receipt for the goods you are selling.
The receipt you will create using sale/refund will not affect any of your inventory. This option is available only for selling other things which is not your primary business.For selling goods or medicines with stock management we will discuss this later in documentation in Pos section.
14. Import Stock
To upload your existing stock prior before using this app you can upload your stock using import stock option. This section is very important i will recommend you to read this section carefully because there are important concepts that we are using in this app.
Once you click on the import stock from the initialization menu you will be able to redirected to the import stock screen. Here you will be able to see few buttons on the top and empty fields.Lets discuss the buttons and there actions.
- Clear All : To clear all the fields
- Add Row : To add a new row by default there will be only one row.
- Download Stock CSV : This will download a excel csv file for sample to upload.
- Upload Stock CSV : Once you download the stock csv from above description . You will upload in this option.
- Save Stock: By filling the items in the form correctly you can save that record into the database using save stock.
Upload Stock One by One
Lets add an item into stock .You will be able to see fields in front of you for reference there is image attached below.

lets discuss each field one by one
1. Product Name
Name of your item or medicine for example panadol or Nestle Water Bottle
2. Generic Name
Generic name of the item if you are using medix. In our case we have chosen panadol so the generic name of panadol is Paracetamol.
3. Barcode
Barcode of the item to scan using scanner on Pos screen.Currently this app is not generating the barcode but you can scan the items using barcode scanner in this app.You will need to enter or scan the barcode no of your item.
4.Product Type, Brand Name, Brand Sector, Category
These four fields are just labels to filter the items based on these labels for reporting.These labels are upon users choice if you want to filter the items based on above fields in reporting then you are required to choose or define the appropriate tag for the item.If you don't wanna scan via these label tags then you can choose None to avoid complications while adding stock.
5. Side Effects
You can add side effects of the medicine which will be visible while selling the items on Pos screen. This field is optional.
6. Strip Size
Strip size is a important concept here.Lets see the image which is attached as a reference about the strip size below.
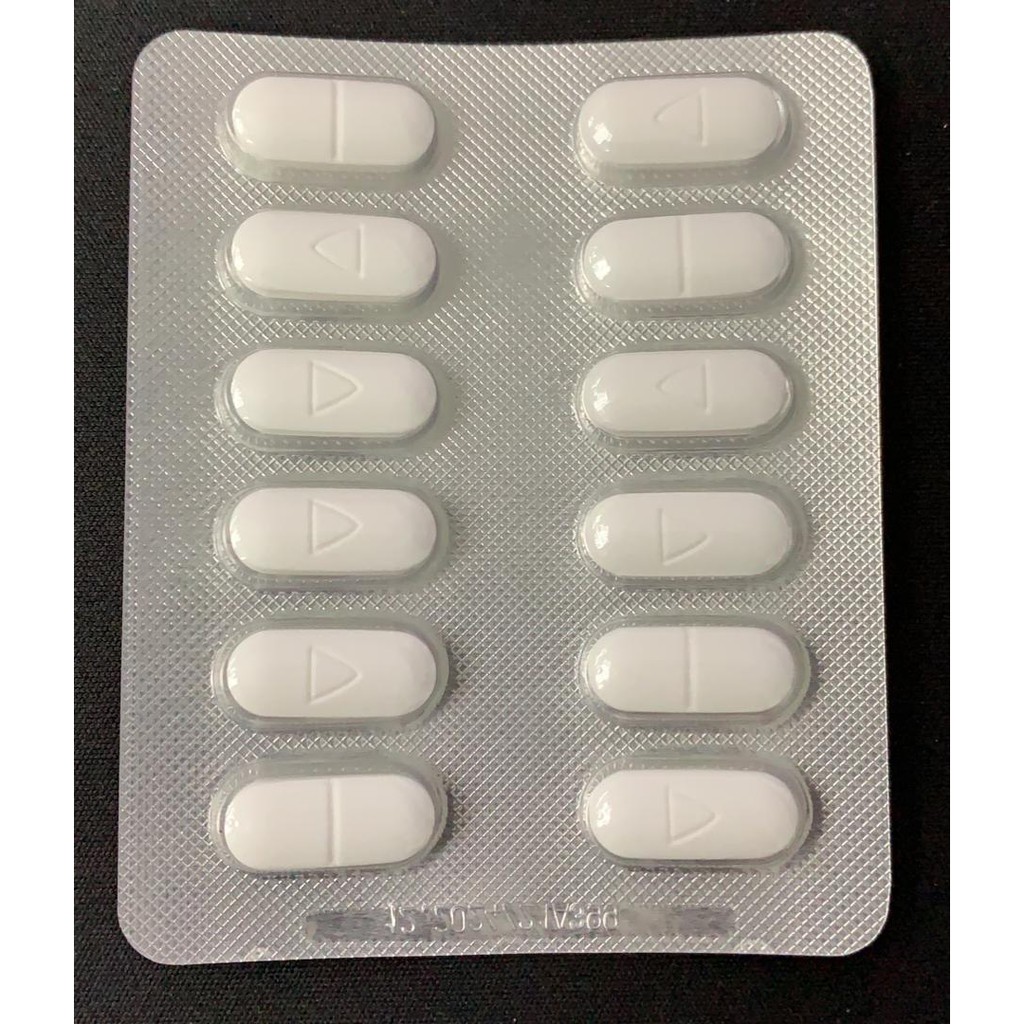
The above image show's One Strip. There are 12 units means 12 tablets in one strip so the size of the strip will be 12.
If there is no strip for example syrup then you will add strip size to 1.
Strip size is required so that while selling the stock from pos screen it will reduce the stock qty based on strip size.
7. Pack Size
Just like strip size above the pack size of the item will be the number of units in one pack.
For example if you look at the below image you will be able to see that there are 48 tablets which means there are 48 units or 48 tablets so the pack size of this medicine will be 48.

Just like strip size is required pack size is also required for stock management.
Remember that in stock each item or medicine is stored in minimum unit. for example if you add 1 pack of panadol to stock. In stock the qty of the item will be 48 units or in strip case 12 units.
8. Unit Quantity
As name suggest the unit qty on the item. lets count the unit qty on 2 packs of panadol.
For example you have 2 packs of panadol in each pack there are 48 tablets as shown in the pack size of the above image. So the unit quantity of 2 packs of panadol will be 48 * 2 packs = 96 Unit quantity.
Unit quantity is dependent on Pack Size so if pack size is 1 then no of packs you have will be multiply with 1.
Just like strip if your item has no pack then you will enter the no of quantity you have. for example i have 10 bottles of syrup then you will enter 10 in unity quantity for this pack size and strip size both will be 1.
9. Expiry Date
Expiry date of the medicine or item.
10. Pack Purchase Price
When you do purchase will you will be able to see in later section there you purchase the items in packs. By defining the pack purchase here this amount will be reflected in purchase and purchase return screen.
Here you will enter the purchase price of pack at which you purchased from your supplier / vendor.
11. ITEM WORTH AMT
Purchase Price of the stock unit wise (1 tablet or Item). For example if we have 2 packs of Panadol which has 48 Tablets in one pack. So its pack size will be 48. and purchase price of 1 pack is 150.
lets find the item worth amt so the formula to find item worth is worth = (total unity quantity / pack size) * purchase price of single pack.
So in the above case of Panadol item worth will be (96 / 48) * 150 = 300
12. MRP (TAXES INCLUSIVE)
Mrp or maximum retail price which is tax inclusive at which you are selling items or medicines to your customers. Most of the case mrp will be there on your product. You can also add the direct selling price here at which you will sell from pos screen.
13. Pack Price (MRP - TAXES)
Pack price will be calculated automatically by reducing the mrp with taxes. if you have set tax percentage to zero then pack price will be equal to MRP.
14. Batch No
Batch No is very important here thats why this field is required.In order to enter batch no you will be able to see the batch no of your item or medicine. for example lets look the below image .You will see the Batch no of this product is KM9153.

Batch no helps you to maintain the expiry and avoid overriding the medicines while doing purchase.
For example you purchased 1 packs of panadol at $20 have batch no KM9153 . After a while your purchased another 1 pack of panadol at $15 at have batch no DY8569 .
When you do purchase with different batch no like above it will add separately in database means you will have 2 panadols in your stock because it has different batch no. If the batch no is same of both medicine it will just increase the qty of the item in stock .
Remember if batch no is same and price is different while doing purchase it will ignore the price at which your purchased and keep the database one for selling of your new stock.
15. Taxes
After Batch no you will be able to see the taxes you set while setting up of your store. If you do not have yet set the taxes then go to the Branches from the initialization menu.
Here you will enter the percentage of taxes on each item.
16. Discount Percentage
Discount percentage is the percentage of discount you want to offer to your customers on each item.
17. Minimum Stock
Minimum Stock helps you to keep track the quantity of the stock for managers. You will need to enter the min quantity you want to keep for this item.Once the qty in stock goes below this . This item will be automatically reflected in stock shortage report.
18. Store Locations
At which location this item is palaced in your store.So the user will be able to see the item quickly instead of search across the store.
Save Stock
From the import stock screen lets fill out the required fields. on the top of this add stock from there are 4 indicators which are important to see while saving stocks lets see what those means.
- TOTAL ITEMS : The number of items you added to save in stocks.
- VALID ITEMS : If all required fields are filled correctly then it will show you the qty of correctly filed items.
- INVALID ITEMS : Like valid items shows you quantity of valid items this will show you the qty of invalid items.
- STOCK WORTH AMT : Total amount of stock worth while saving into stock.
Once you filled the items as described above now click on the save stock button on the top right corner. If everything you added is valid them you will be able to see the successfully notification.
Bulk Stock Upload
Sometimes you want to upload 1000 of items in just one click. To upload bulk stock first you will need to download the sample csv file from the import stock menu option there click on the Download Stock CSV button on the top.

Clear all the existing items in csv file and fill the CSV file based on the headings for the new stock you want to upload.
If you are doing this first time i will recommend you to upload 1 items first.After that fill the csv file and upload it all.
Once you will the csv file now click on the Upload Stock CSV button and upload the csv file that you download and filled previously.
Once you click upload all the items you added in csv file will be visible on your browser screen. Now its time to see the indicators i discussed above.
If all the fields are valid and correct the invalid items will be 0 on the top. If its not 0 then you will need to find that invalid item and fix.
Once all your items are correct now click on the save stock button on the stop.
If everything is good you will be able to see successful notification.
Remember uploading in bulk in dependent on your server resources if you are uploading more then 500 items at a time then i will recommend you to install the app locally and upload all the items in local database.After then replaced the database stock table to your live server's stock table.
15. Stocks
All of your imported stock from above option will be visible here.Stocks is actually is to show the existing stock available in your store. You can search and adjust stock qty and its price here.
The important thing in stock is to adjust stock.When you adjust the stock like changing its quantity or price or pack size it will affect the accounting's of your store.
For example you purchased the 2 packs of medicines whose price is let says $50.Now when you adjust the stock and changed its price from $50 to $40.The price of medicine in stock is changed but in the accounting inventory it was $50 at you purchased.
Adjust stock option you can use when you know what you are doing. Changing name of the brands or other filter options you can make which does not cost any thing.
16. Profilers
Create or manage customer or Suppliers profile. In this option you can create a new customer of supplier by choosing the appropriate option type .
There are 2 required fields when you create new customer/supplier. Account Title which could be customer or supplier name and contact no.
17. Thermal Printer
Thermal printer is only supported for offline purpose on Windows Machine only.You cannot generate receipts if you are hosting the app on any hosting server.
You can connect you cash drawer with the thermal printer so when ever it generates the receipt it will open the cash drawer as well.
By default thermal printer is disabled.To enable thermal printer in you app navigate to the dir and edit the file in your text editor.
ProjectFolder/backend/config/constant.php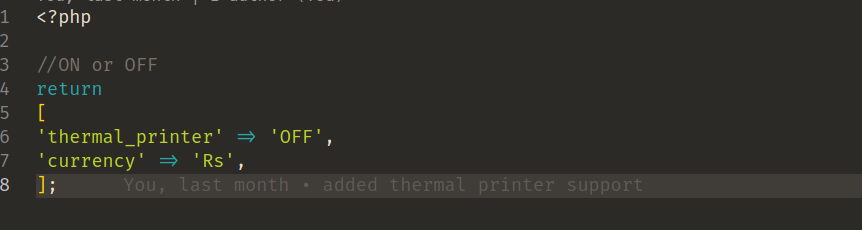
From the above image see the thermal printer option is OFF.Make it to ON like this 'thermal_printer' => 'ON',
After turning on the printer option now install the thermal printer in your machine.Once printer and its drivers get installed Take a test print to make sure its all working properly.
Not all the thermal printers are supported here is the link where all the supported printers are listed.Make sure you are using one of this.
https://github.com/mike42/escpos-phpGo to the printers section from above link
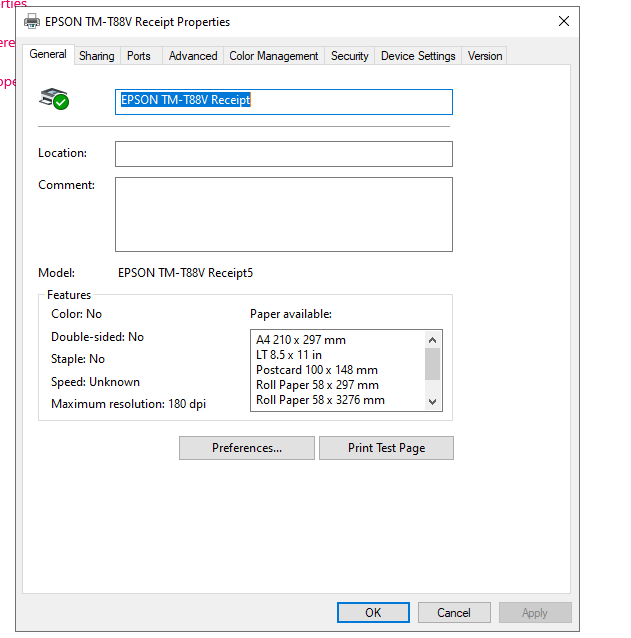
Once printer and its driver is installed on your PC . Open the printer & scanners on your windows machine click on your installed printer and click on manage button.
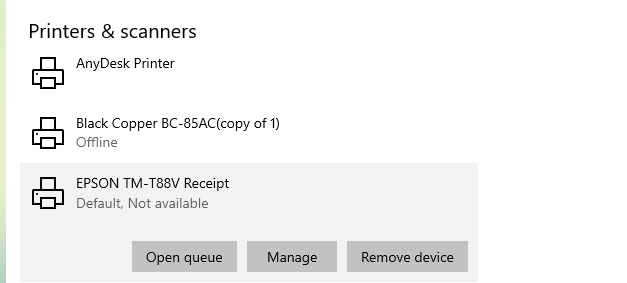
From manage printer click on the printer properties option from the menu list.
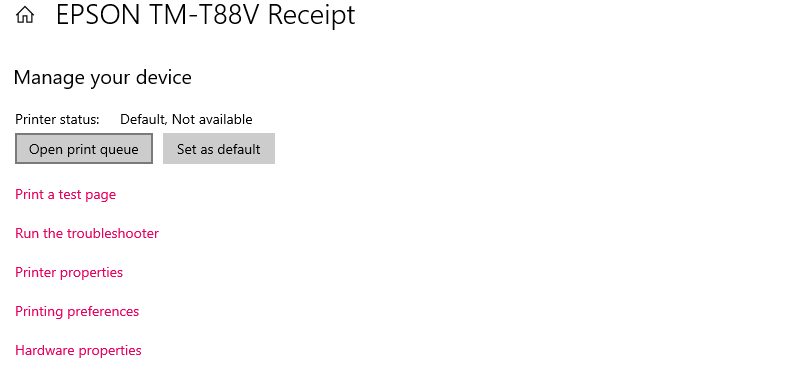
From properties copy the printer name in my case the printer name is EPSON TM-T88V Receipt.
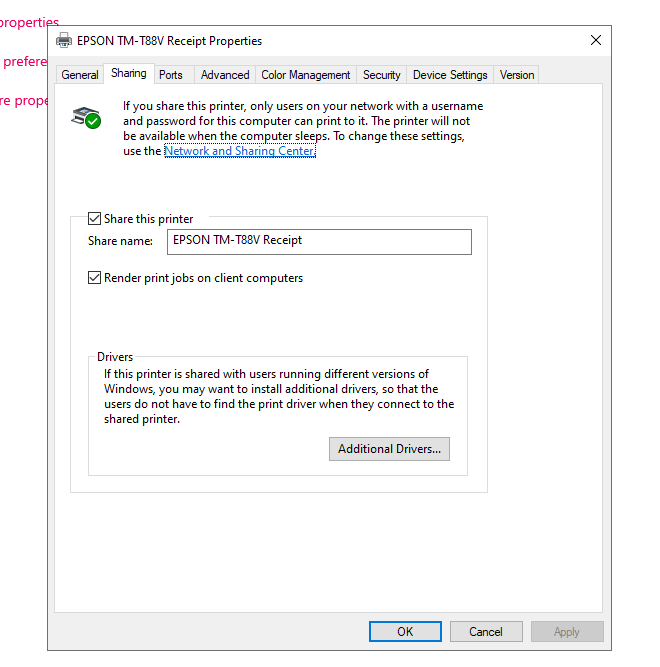
After copying the name click on the sharing tab next to General tab from printer properties.Click on Share this printer checkbox and save the settings.
Now from the initialization menu click on the thermal printer and click on the plus button to add new printer. Paste the same name we just copied it from printer properties and save it.Choose printer type Regular and Default printer to Yes.
Now when you create a invoice from orders it will print a thermal receipt.
18. Receipt Content
Create Terms and conditions or Return policy underneath of the thermal printer receipt. You can add anything related to your business model to your customers.
19. Requested
Note down the requested items from customers to remember for later while importing stock from supplier.
20. Privileges
This option is used to make users role base access to the app. Sometimes you don't want that user can see certain option or reports. To restrict users from access the options you can assign different roles that are by default available in this app.
Currently there are 3 types of roles.
- Branch User
- Branch Admin
- Admin
These three roles are fixed currently in the app.Now you can set options which can be accessed whoever user has these roles in their profile.
Go to the Privileges option and choose the role from the dropdown option . You can see the default options that has been set for this role.
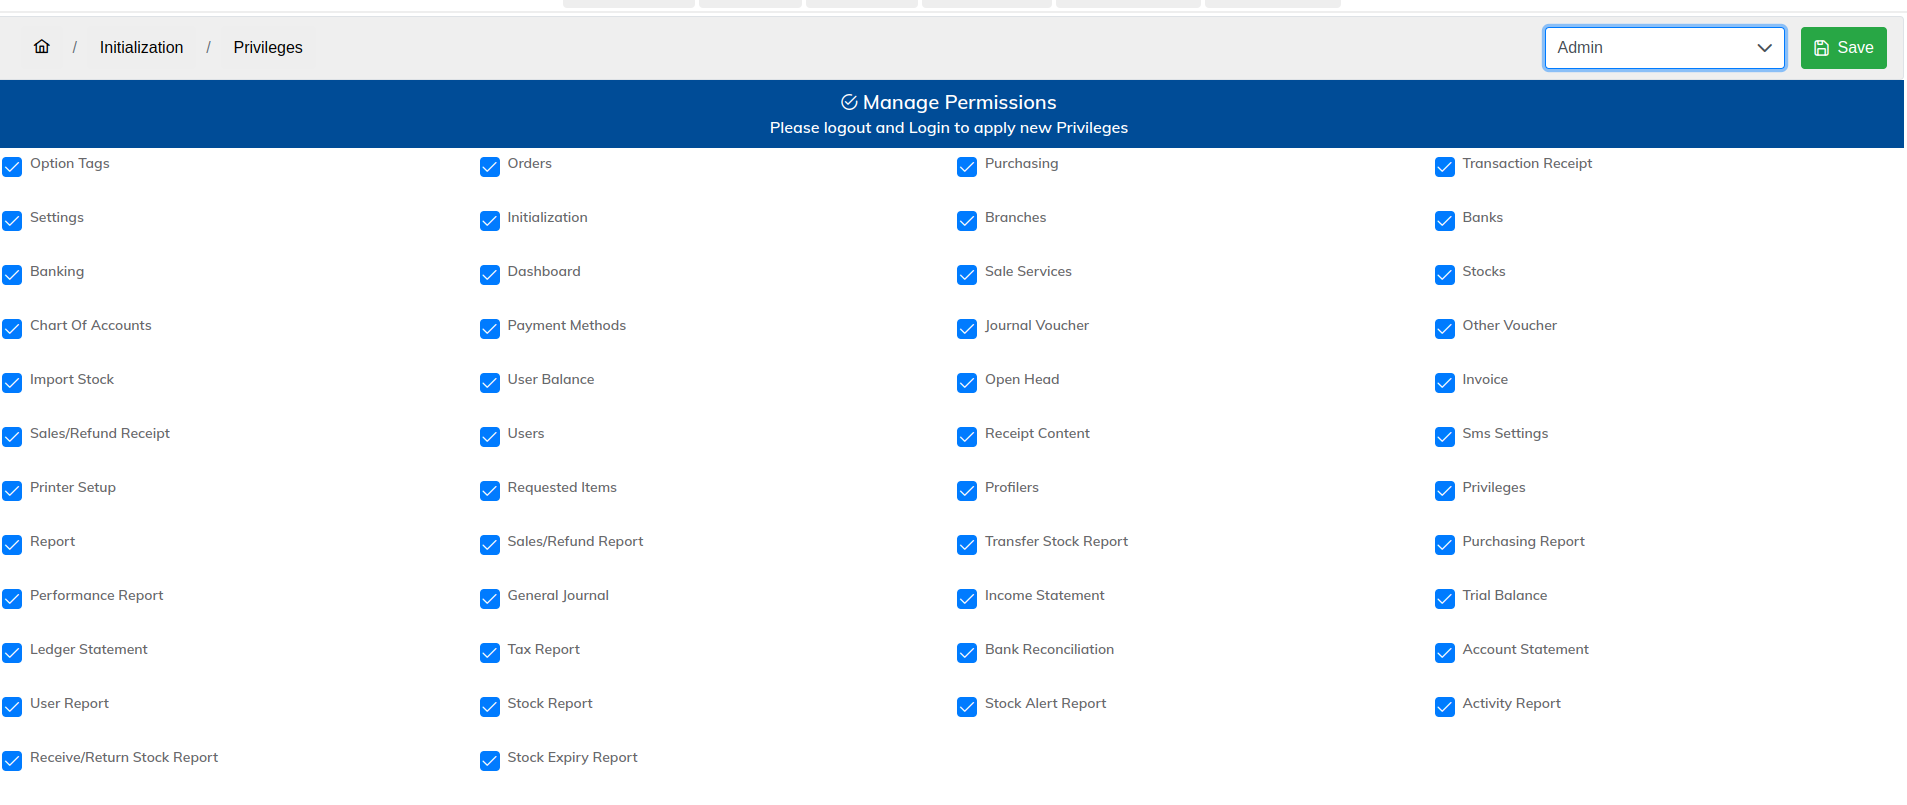
As you can see in the above image admin has all the options access which currently in system exists.You can check and uncheck this options and save the roles.
Once you made changes in the Privileges you will need to logout and login again to make the action working.
So far we have discussed what each option in initialization menu can be used and its purpose. Our next part now it to seeling items / refund / purchase or purchase return.
Lets discuss each available options to perform above features.
Navigate to the dashboard and click Orders from the menu.
Create Invoice
From orders you can make invoice/refund or transfer stock from one store to another store.
lets discuss this screen step by step . for the reference you can see the image below
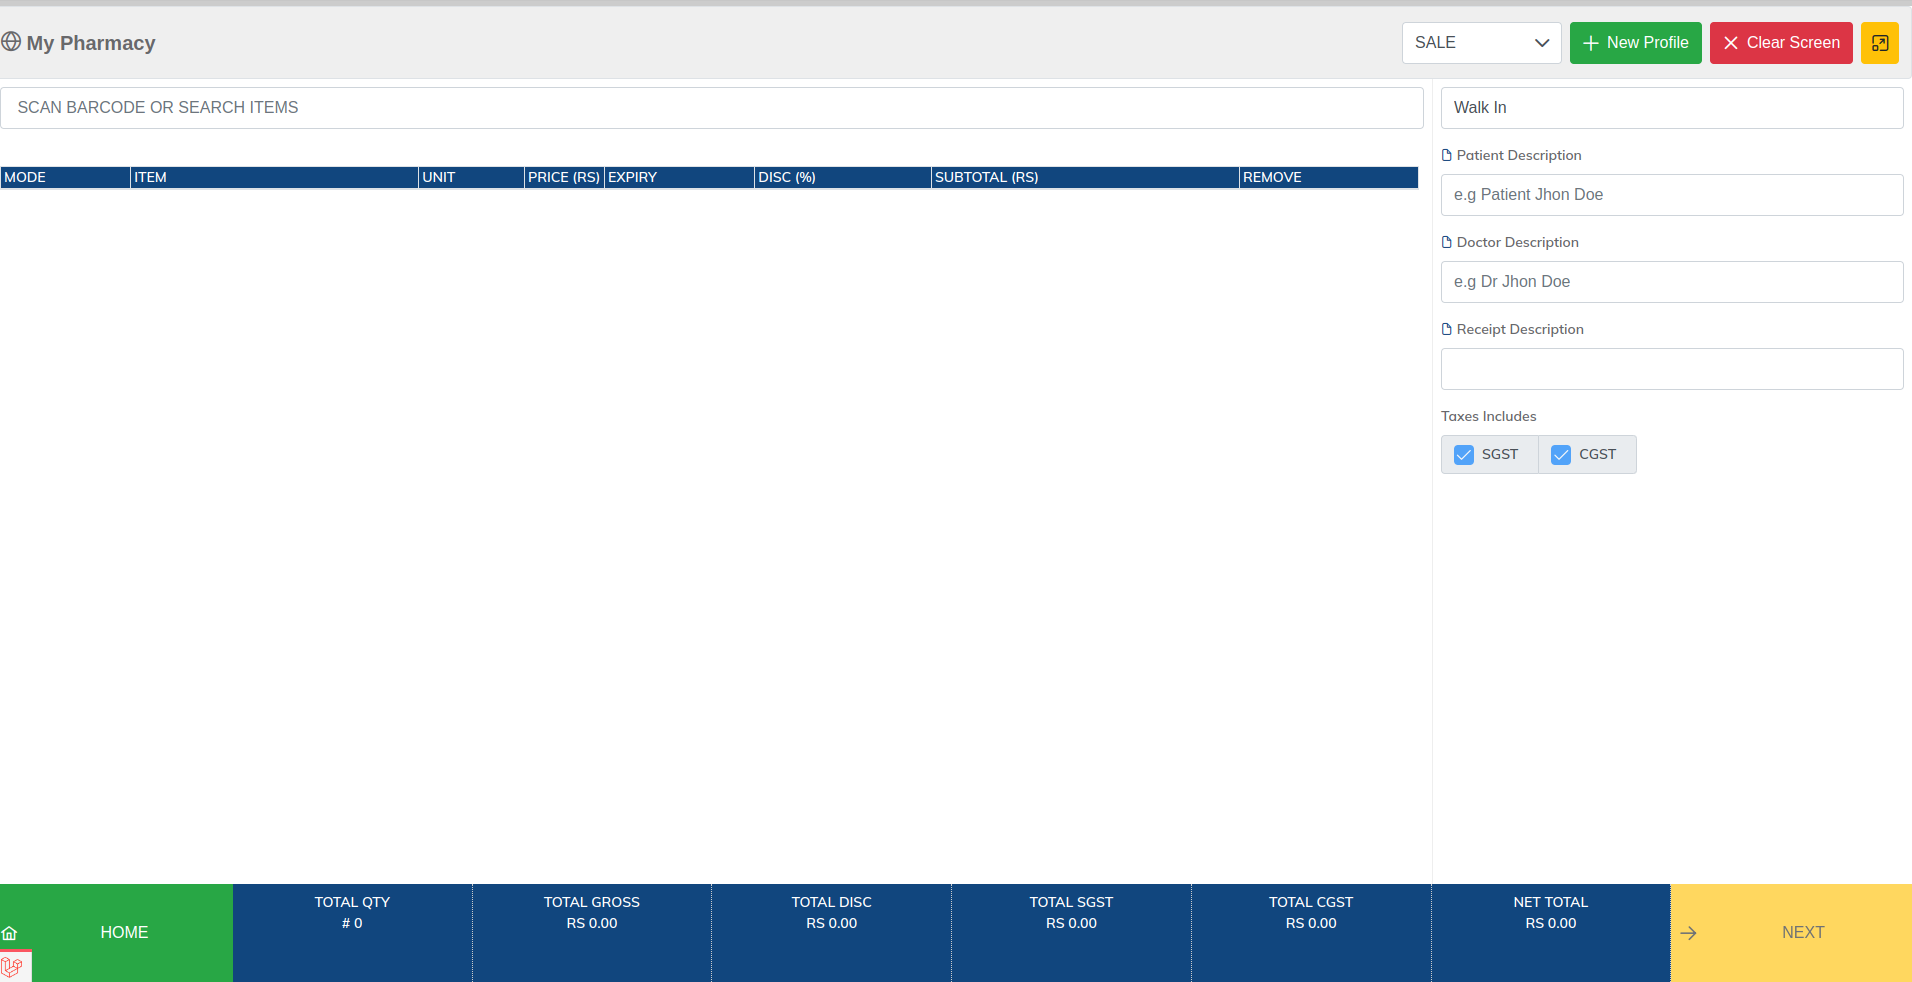
From the top right corner you can few buttons and a dropdown menu see whats each purpose there step by step.
- SALE: When selling goods to customers.
- REFUND: when returning goods by customer which you have sold to them.
- TRANSFER: when moving stock from on store to another store
- New Profile: Create a new customer which is not currently exists in your system.
- Clear Screen: As name suggest its used to clear the screen.
- Arrow Button: There is a yellow button which is used to make app full screen.
To search the medicine you can either scan the item barcode inside the search area or you can search the goods from here. Remember when searching item it will only show those items or goods whose expiry date is not yet over.

All the option we discussed in stocks section above you can see some of them are visible under items search result
Click on the item you want to sell.

All the options you see in the above are start forward and we already discussed previously but one important option you can see which is mode here
Mode has 3 types
- Pack: When selling items in Pack (concept we discuss earlier in stocks).
- Strip: When selling items in strips.
- Unit: When selling items in units.
The only difference between all these are the qty. You can see the qty will be changing which switching between all these. for pack the price will be used which you have set while adding stocks.
For unit and strip prices will be pack divided by pack size for unit and pack size / strip size for unit item price.
Another important thing in orders is taxes that you can see in the bottom or right section.
By default all the required taxes will be selected and you can not un check it. Only those which you specified optional can be check or uncheck. See the taxes section which we initially did setup.
Click Next for the payments. After clicking on next button you can see a pop up dialog will be appeared on your screen. From here you can choose payments method which customer wants to proceed for invoice.
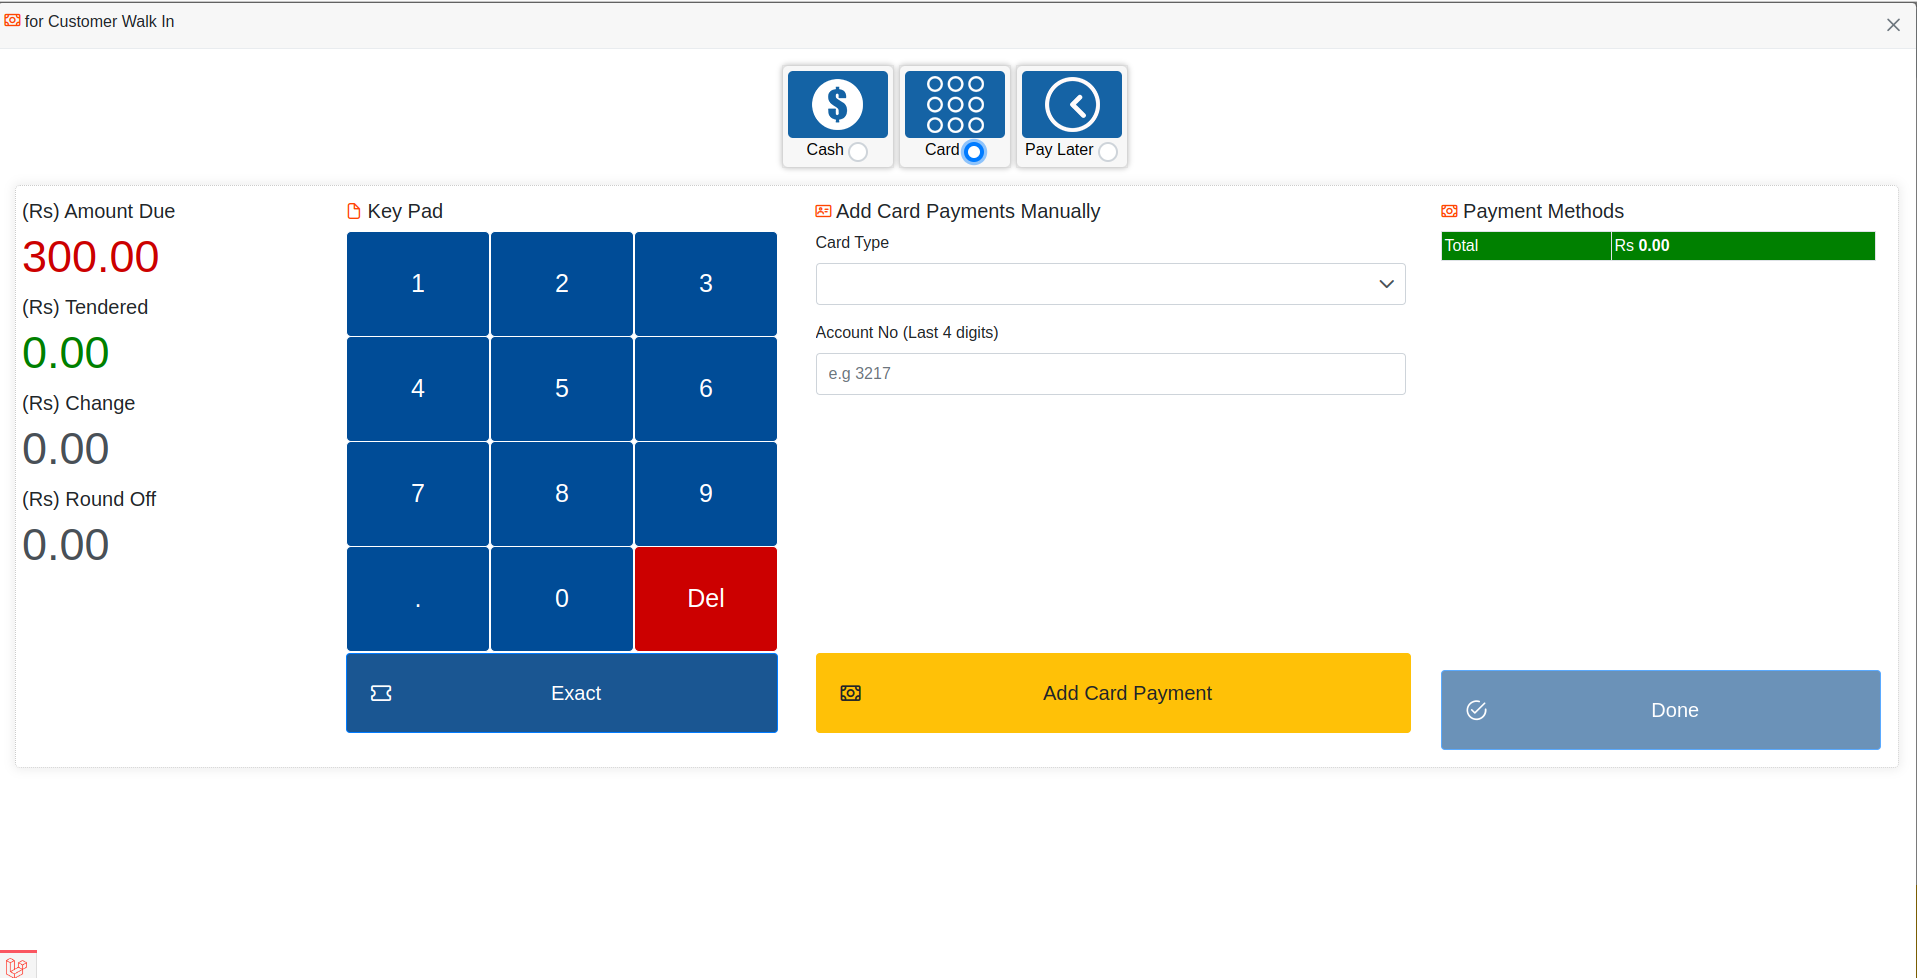
Choose the appropriate payment method based on your need.You can do following ways to proceed against payments
- Full Cash: Click Exact button if customer is paying full amount.
- Partial Payment: You can proceed if customer want to pay half and half later.
- Split Payment: You can proceed half cash and half which bank cards.
- Pay Later: If customer wants to pay it later then you can choose pay later.
Once you add the payments you can click on the done button to save the invoice.
Create Refund
Similarly like creating invoice creating refund is opposite in terms of stocks. When creating invoice it reduce the stocks but on refund it increase the stock to original quantity.
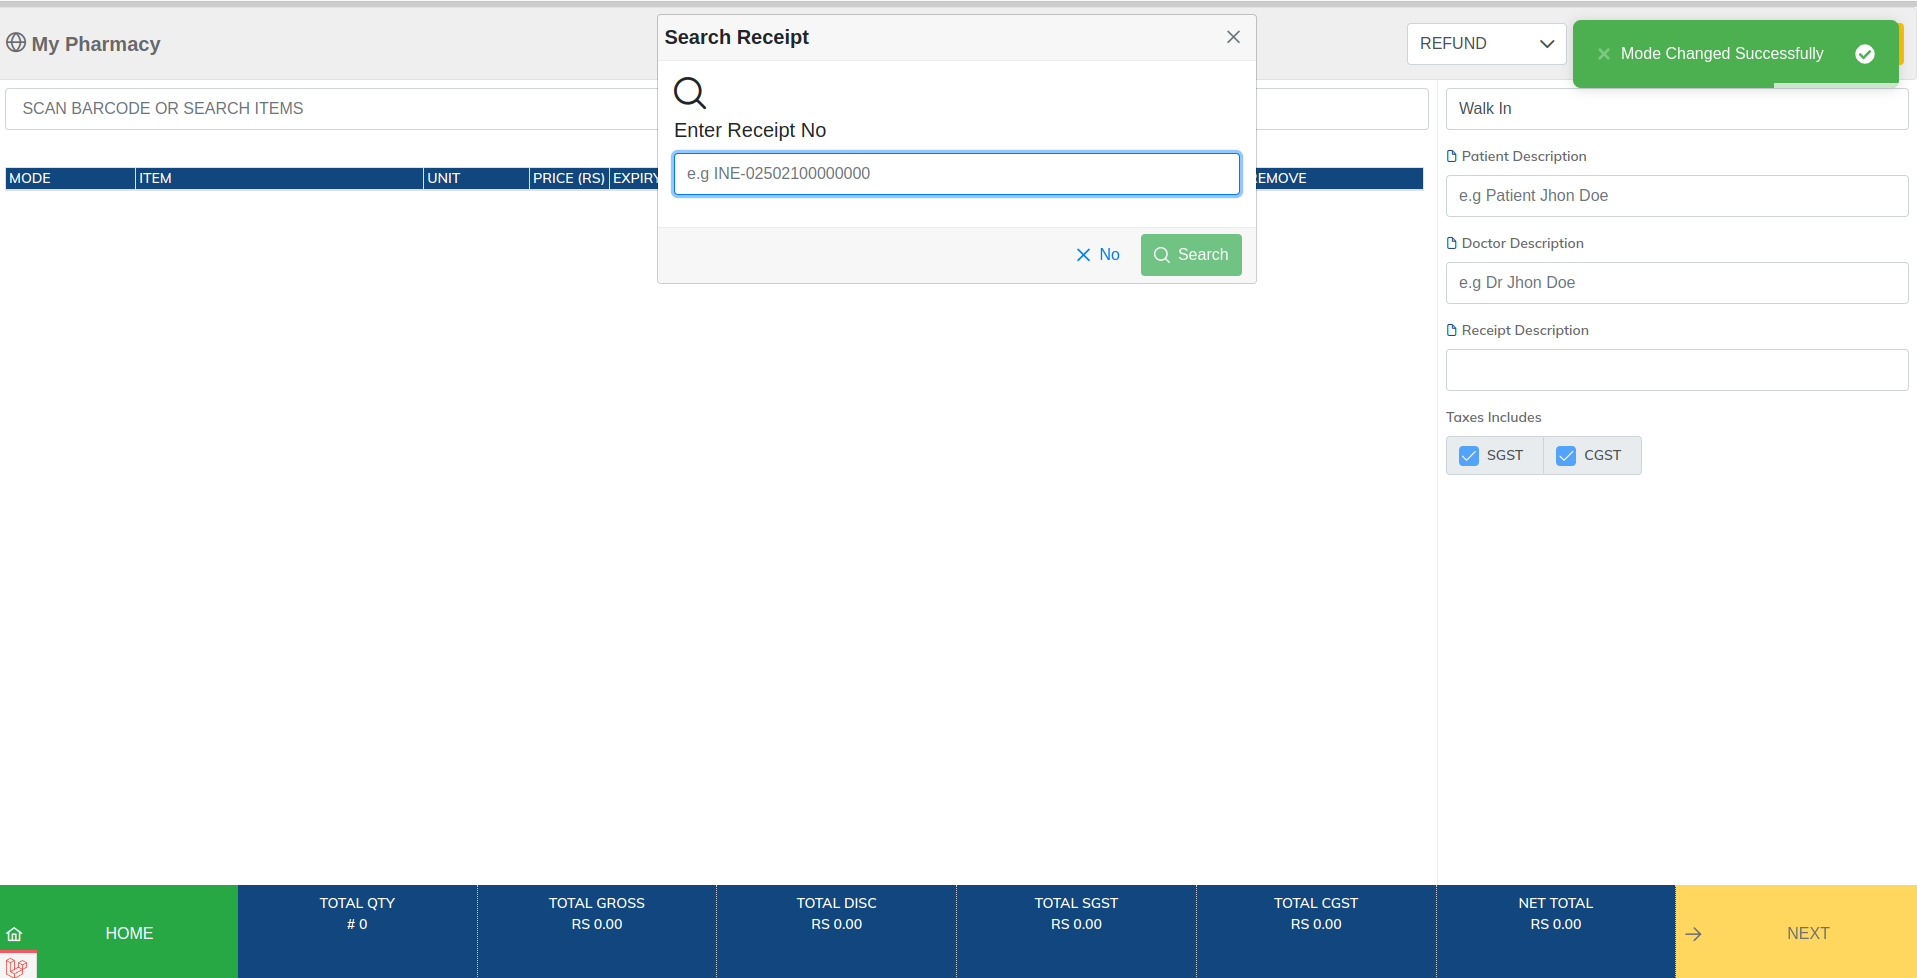
The only difference in terms of usage is in refund there will be popup dialog will appear to enter the invoice no to refund.
Once you enter the invoice no it will load the original invoice so that you can reduce or refund the full invoice.
Transfer Stock
Similarly like sale transfer is almost same except there is a option to choose the store to where you want to transfer your stocks.
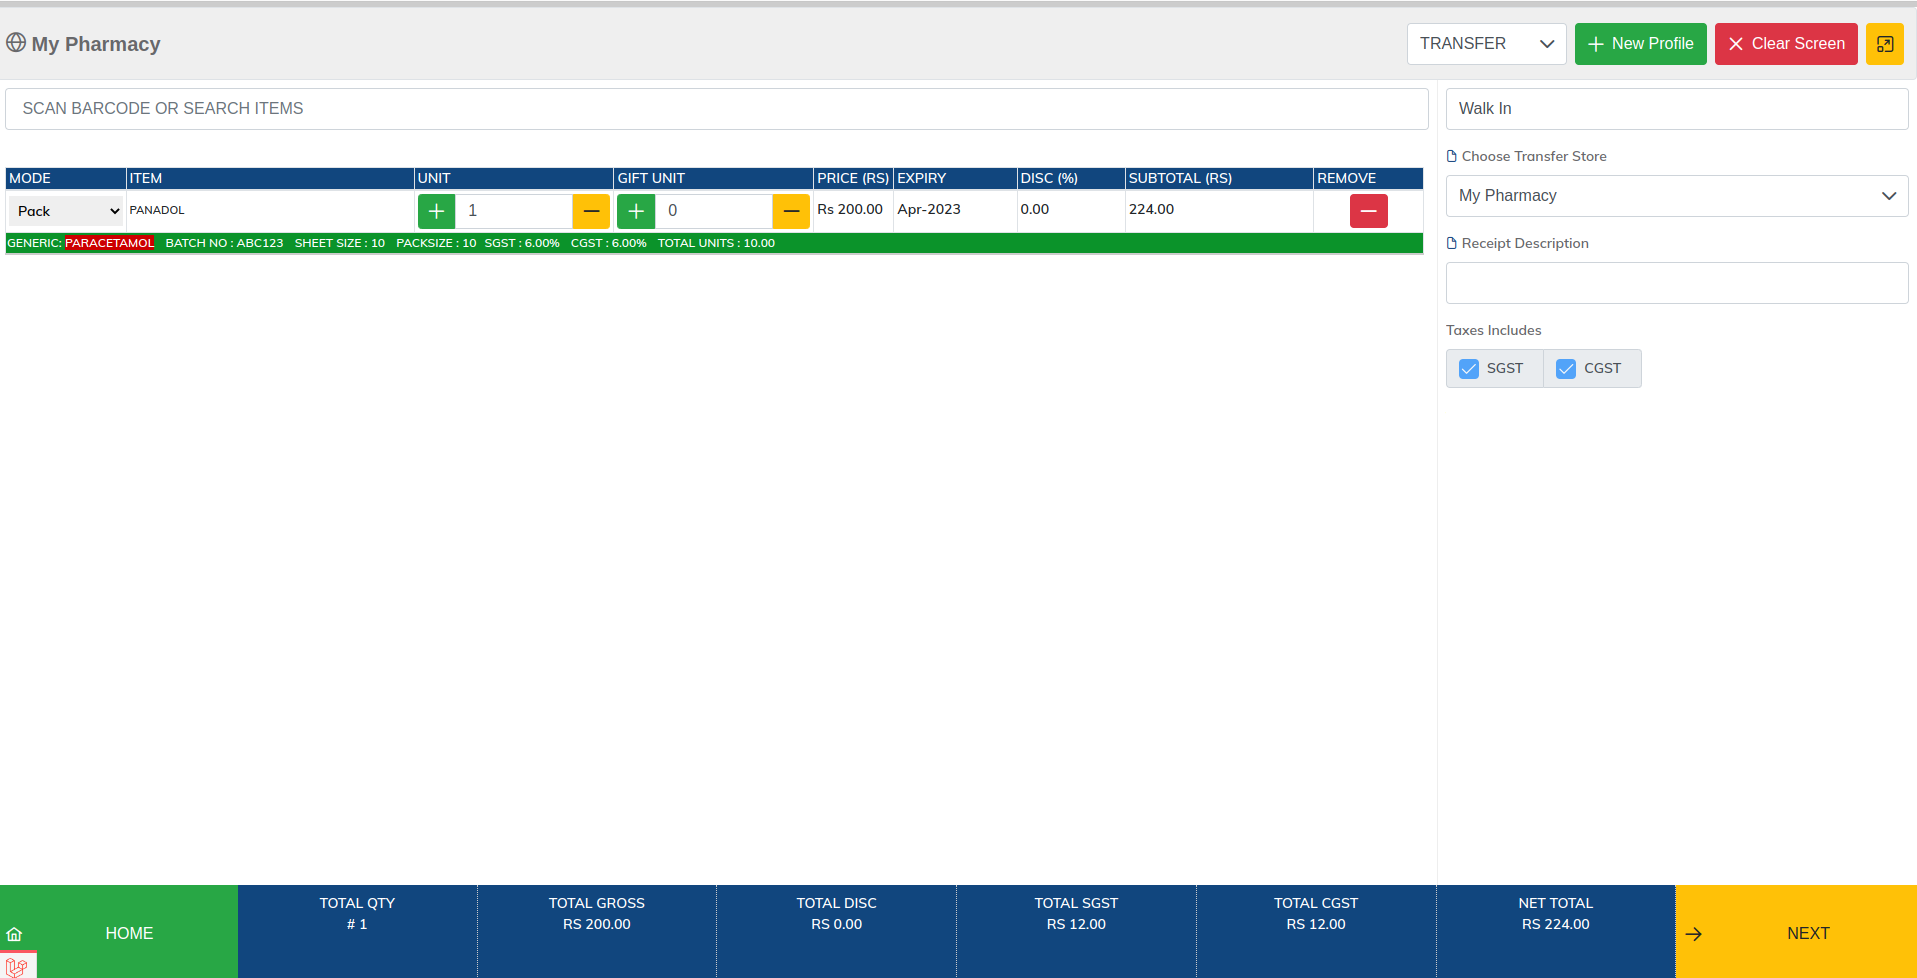
Transfer stock can be use to transfer stock between your stores.Choose the items you want to transfer and choose the store where you want to transfer stock.
Once you saved the transfer stock it reduce the source qty of source store but will not increase or add the destination store stocks.
Now to the transactions option from the menu.You will see the dropdown option there choose transfer stock. Click on the blue cog button.A new Popup menu will occur there you will see a option to leave the stock. Click on this button to leave the stock.
Similarly like leaving stock on the destination store you will need to click on the receive stock button.
Now Logout and login to the destination store where you transfer the goods. Navigate to dashboard and click on the transaction option from the menu bar.
You will be the bunch of options in the dropdown list. Click on the transfer stock option from the menu.

As you can see that we received a transfer of stock from our source store. Click on the blue cog button to see the available options you can do with this transfer.
Create Purchase/Purchase Return
Similarly like creating invoice/refund all the options in create purchase/purchase return are same except that mode option in purchase / purchase return does not have because purchase always deals with pack.
Whenever you do purchase / purchase return you will be dealing in packs .On the top right corner there is a search field for supplier to choose.
Transactions
All of the receipts you create from invoices / refund / transfer / purchase / purchase return . You can see all the transactions here in transitions.
Go to the transaction from the menu bar there you will be the list of dropdowns which mentioned in above line.
Choose each option to see the list of its receipts you created.There is a blue cog button to see the all available options you can do in each receipt.
Most commonly you can see the Payment History,Print Receipt or Receive Balance against your due invoices.

Currency & Other Settings
In order to change the default currency in medix/pencil you will need to edit a file. Open file and edit it which is metioned below.
ProjectFolder/backend/config/constant.phpIn the constant.php file you will find all the settings which cant be control from app UI.for example if you want to edit the copy right text in the footer and all the future coming settings will be available in constant.php file.